|
|
||||||
|
Digital Video Editing |
||||||
| FTLComm - Carrot River - Thursday, November 27, 2003 | ||||||
 With your computer you can edit the video you've taken and either transfer it back to your video camera for copying onto a regular VHS video tape, or you can create MPG's and have them burnt to CD. The basics of shooting video apply. Hold the camera steady, use a tripod if need be, keep the scene centred and stay off the zoom button. Take your cues from Hollywood productions: watch their techniques and follow them. When purchasing this package last year I shopped very carefully. I bought the camera that suited my needs best and researched the editing software carefully. After watching features on Tech tv and reading every review I could I purchased Studio 7 DV by Pinnacle Systems. In every review it was highest rated for user friendliness and strength of performance. The package included a IEEE1394 Firewaire card. With interface card and software installed I watched the tutorial video and began to experiment. |
||||||
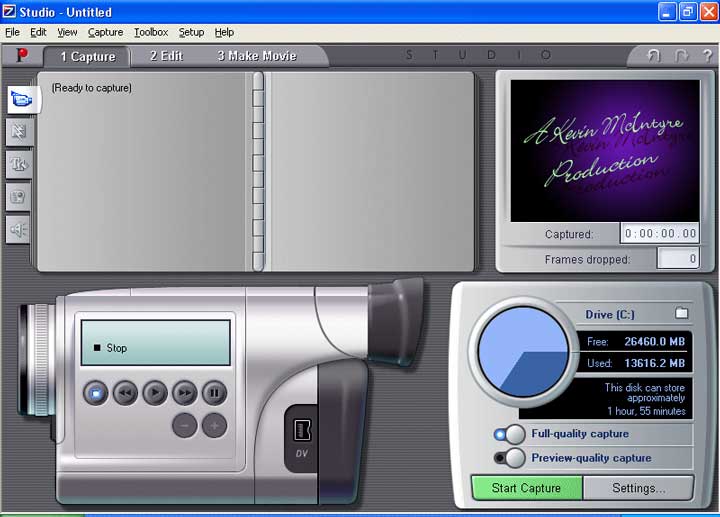
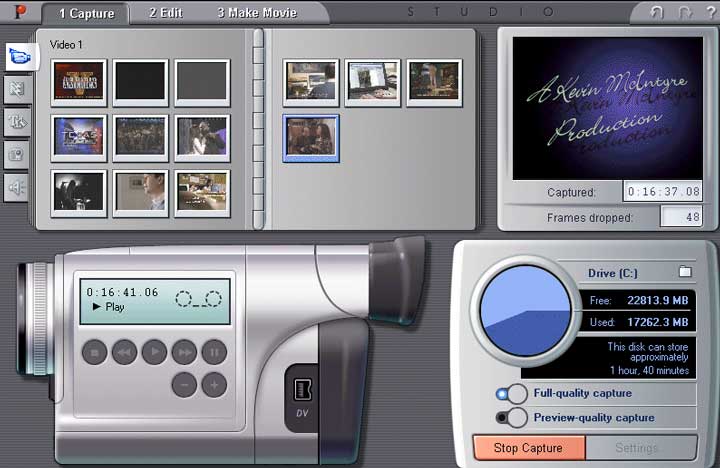
 Plug in your camera's power source, rewind the tape and connect your
camera to the computer. Open the software and select the Capture tab. On the
screen you will see a representation of a camera with functional control buttons
and a chart showing information on available room on your drive. Click the Start
Capture button to begin the process. Plug in your camera's power source, rewind the tape and connect your
camera to the computer. Open the software and select the Capture tab. On the
screen you will see a representation of a camera with functional control buttons
and a chart showing information on available room on your drive. Click the Start
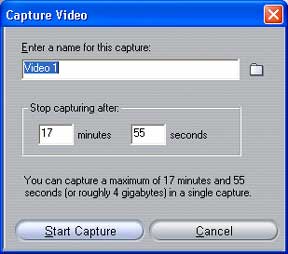
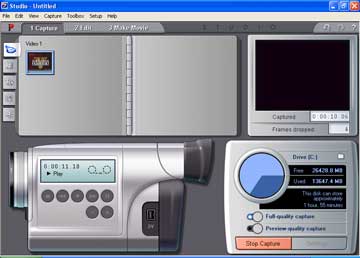
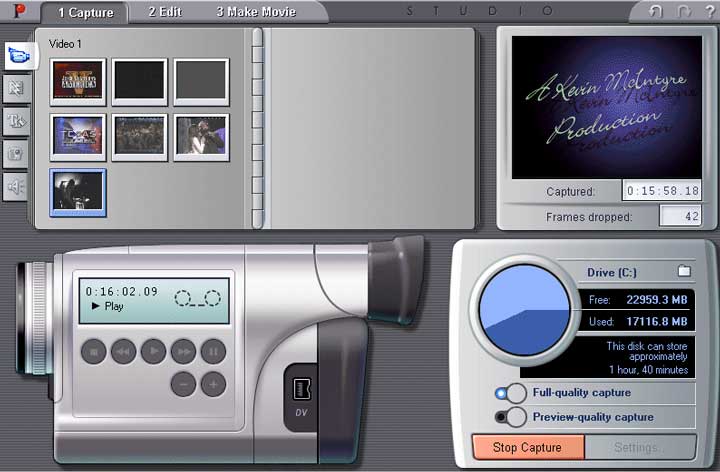
Capture button to begin the process.A dialog box will appear prompting you to name the capture file and to set the length of the file. On this package you are limited to 17 minutes and 55 seconds per capture. You can do as many individual captures as needed, or drive space allows. Click Start Capture. The computer will start the camera and begin capturing the raw video. These files are huge, you'll need 4 gig of space per 17:55 of video. When you are shooting the video, each time you pause or stop the camera it will Index the tape. On capture to your computer these Indexes show up as new Capture Boards on the top left of your screen. When you have your project on computer you'll have many Capture Boards to select from, and using the drop down box you can switch between any of the 17:55 captures you have. |
||||||
 |
||||||
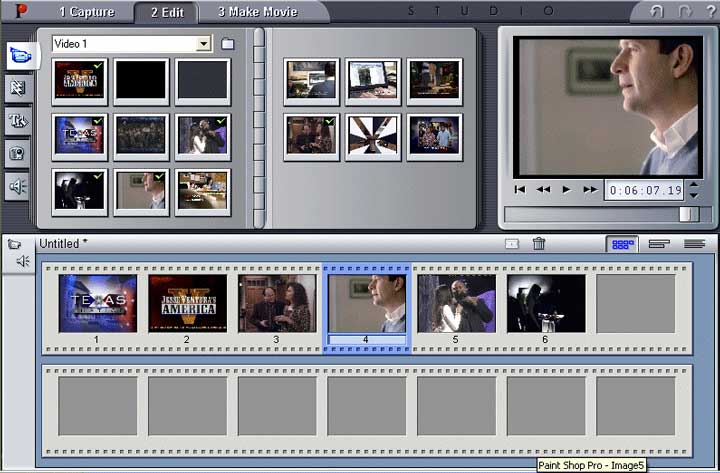
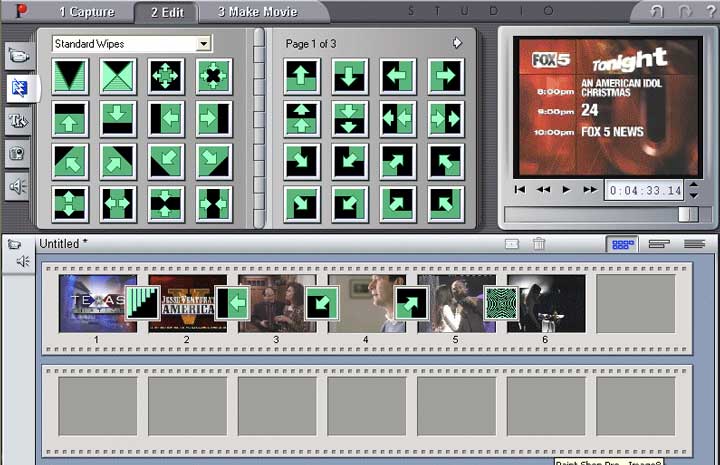
| Moving to the Edit tab the screen now displays your Capture Boards and a film strip in which to drag and drop them. This can be done in any order, any sequence, from any Capture project you have done. On these clips I did captures from a couple of television shows I transferred from satellite. Yes, you can combine broadcast footage with video you have shot yourself! | ||||||
 |
||||||
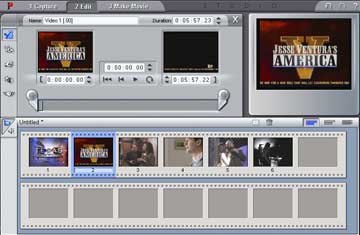
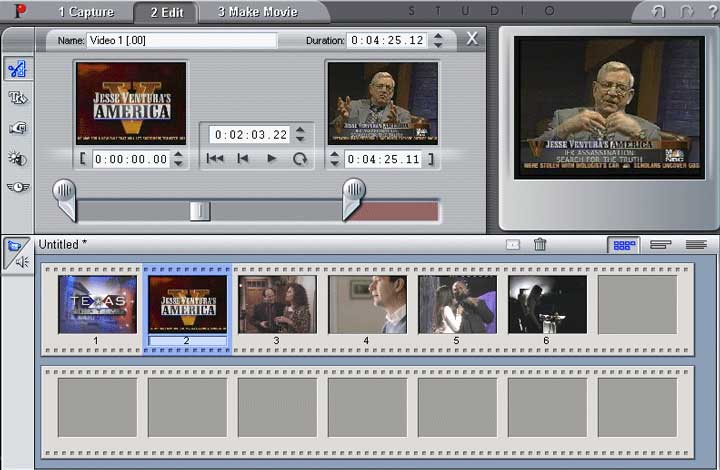
| Now we edit. Video is video and on the computer bits is bits. Let the camera record, here is where we edit unwanted footage. Double Click on any one of the video clips you've pulled down to your story line. An edit screen slides up showing a screen of the start of the clip. The end of the clip, time indexes of both and a time indicator in the middle. You will also see handles at the start and end of the progress marker on the timeclip. Press the start button to run the clip. Watch the clip, note your edit points, stop or pause as needed. When you see the start point of where you want to begin key that time point into the Start screen. Then find and key in your end point. Loop the clip to confirm your selection. Click the X to drop that edit screen. You then repeat this process with all the Capture Clips. Remember, you can put these in any sequence you want. | ||||||
 |
||||||
 If you run up against the 17:55 limitation in a key scene, edit the
transition out! On the second 17:55 capture, rewind the tape slightly and use that
as your start point. Look for natural transitions the eye won't notice and use that
to your benefit. Example, we were filming on a street in California,
my wife was holding the camera as I drove. At the 17:55 limitation I watched the
whole scene carefully and found my edit point. I created an edit point of the painted
line of a cross walk crossing the line of the windshield wiper on the vehicle. It
was done perfectly and unless it was pointed out to you you'd never see it. If you run up against the 17:55 limitation in a key scene, edit the
transition out! On the second 17:55 capture, rewind the tape slightly and use that
as your start point. Look for natural transitions the eye won't notice and use that
to your benefit. Example, we were filming on a street in California,
my wife was holding the camera as I drove. At the 17:55 limitation I watched the
whole scene carefully and found my edit point. I created an edit point of the painted
line of a cross walk crossing the line of the windshield wiper on the vehicle. It
was done perfectly and unless it was pointed out to you you'd never see it.On the left of the screen under the red P you will see selection buttons. The second one down allows you to choose swipes and fades from one clip to another. Treat these as carefully as you do the Zoom button. You can get carried away very quickly and make your project look very cheesy very quickly. Always employ the KISS method: Keep It Simple Stupid. These transition clips are dragged down between the scene clips. |
||||||
 |
||||||
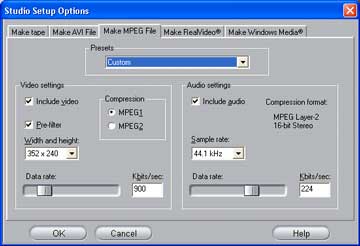
| Once your editing is done select the Make Movie tab. You can go two ways here: create a file on your computer to burn to CD or return the project to your digital camera to transfer to VHS tape. After much experimentation, and this does take time, I found that selecting MPEG, MPEG1 compression, 352x240 resolution and between 750 and 900 Kbits/sec are best. This will create a file of 650 meg for a 90 minute video. When played back on Windows Media Player the quality is very good and if you run it at full screen the result is still quite acceptable. If one selects the TAPE option you can run the feature back to your digital camera for transferring to VHS. My camera allows for real time dubbing. I could plug my camera into the computer with the firewire cable and to the A/V jacks of a VCR with the supplied patch cable. (Remember, this is an entry level Sony TRV-240 camera. It's digital, uses readily available HI8 tape, has 25x optical zoom and shoots in Zero LUX nightvision. Salesmen will love to sell you cameras that cost more and have features you may not need: we have a digital still camera, we did not require that feature in a video camera. Be sure to check optical zoom levels, most other cameras are only 10x.) | ||||||
 |
||||||
 One could also edit the footage, roll it back to the camera then turn
around and transfer the now edited video BACK to their computer and encode
it with software from www.divx.com. The Dr. Divx package will create a file 2/3's the
size of a regular editing suite. Then take the encoded files, roughly 62 meg per
17:55 minutes, and join them with Easy Video Joiner 5.21. One could also edit the footage, roll it back to the camera then turn
around and transfer the now edited video BACK to their computer and encode
it with software from www.divx.com. The Dr. Divx package will create a file 2/3's the
size of a regular editing suite. Then take the encoded files, roughly 62 meg per
17:55 minutes, and join them with Easy Video Joiner 5.21.I have yet to find the limits of this package. There are sound editing features I've never explored. I've taken television broadcasts, edited out commercial breaks and burnt them to CD. Taken movies and transferred them to CD [two steps, digital tapes are limited to 60 minutes] and of course shot home movies. This camera now sells for around $600 CDN, the software [Studio 8 is now out] will be under $100. |
||||||
|
|
||||||
|
|